![]() When editing a layer in
ArcMap, make sure you use the Save Edits option on the Editor toolbar to save
edits as a separate process from saving your map.
When editing a layer in
ArcMap, make sure you use the Save Edits option on the Editor toolbar to save
edits as a separate process from saving your map.
In this set of exercises (3A, 3B, 3C, 3D), you will:
- Logon to the workstation.
- In Windows Explorer, locate the net coverage you digitized in Exercise 2.
- Double-click the coverage name and look at the files in this folder (coverage).
- Remember that a coverage is really just a folder with files inside it.
- Highlight the Contents tab.
You should see the different types of 'layers' associated with the coverage. A polygon coverage should have four layers associated with it: arc, label, polygon and tic layers.
- Double-click each layer and look at at each of the tabs (General, Items, and Relationships). Note the number of features in each and the items, or fields, in each associated table. Click Cancel when you are finished looking at each layer and property.
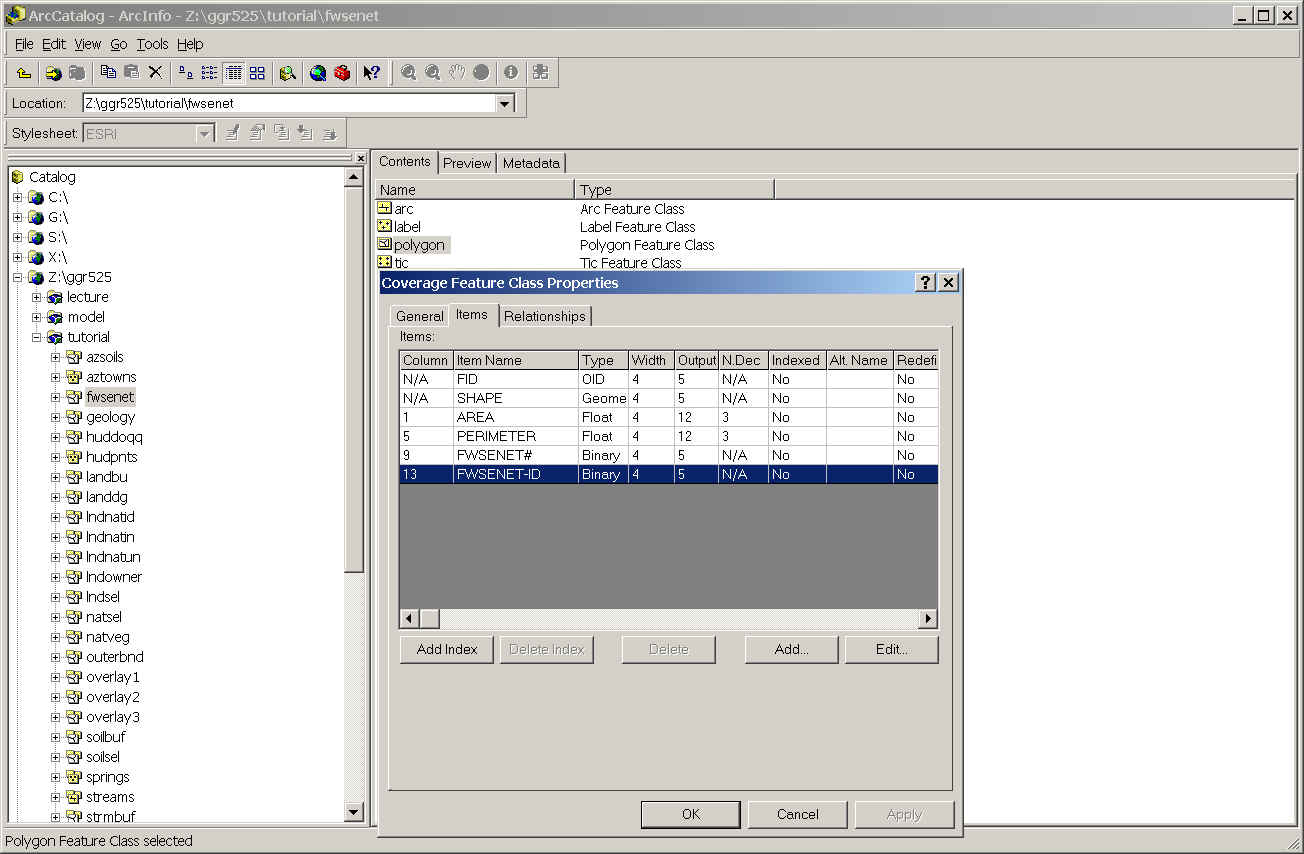
- Now click on fwsenet again and then select the Preview tab.
Look at both Geography and Table. Geography should show you a 'sketch' of the coverage features. Notice what does the table view looks like. Also notice that in the Geography view, features in the polygon layer may be missing.
- Click on the polygon layer (fwsenet polygon) in the catalog window.
Notice that the table changes. You can view each one of the tables from Preview/Table that you previously accessed by double-clicking each layer.
- Next click on the Metadata tab.
Look through all the options for describing spatial data in ArcInfo under each tab: Description, Spatial, and Attributes.
- Right mouse-click fwsenet in the ArcCatalog window.
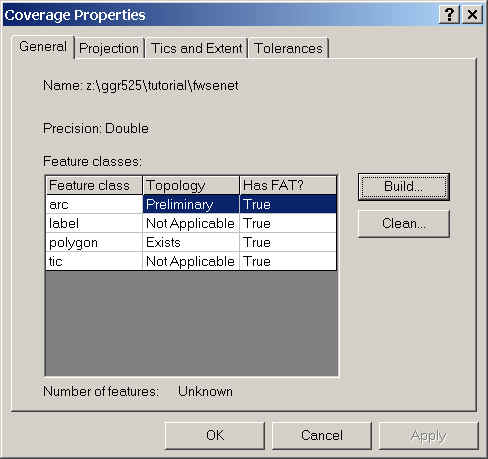
- Choose Properties to see the topology.
Topology is what determines the relationships between features, i.e. which arcs makes polygons, which polygons are adjacent to one another. In ArcInfo 8 (ArcGIS) when you digitize a coverage, the topology is automatically 'built.' However, it is important to know how to find out whether topology exists and how to update topology if needed.
- Look at the other information associated with the coverage from Properties using the other tabs: Projection, Tics and Extent, and Tolerances. Notice that you can define the coverage projection here under Projection. You can add, delete, and update tics (ground control points) from Tics and Extent, and search tolerances for editing can be set for the coverage under Tolerances. Note in the figure above that Topology exists for polygon feature class (layer) and preliminary topology is built for the arc feature class. All the feature classes have tables associated with them. If your arcs or labels are missing topology or a feature attribute table, you need to know how to build or rebuild it.
- In ArcCatalog, highlight fwsenet, right mouse-click, and select Copy.
- In ArcCatalog, right mouse-click tutorial and select Paste.
- Rename the new coverage fwsenetbu by right mouse-clicking the name (fwsenetcopy) and choosing Rename.
- In ArcCatalog, right mouse-click the coverage and choose Properties.
- In the Coverage Properties window choose the General tab.
- Highlight the feature layer for which you desire to build topology.
- Click Build.
- Return to the Coverage Properties window and capture the Coverage Properties to print and hand in.
![]() The coverage fwsenetbu now
has the desired topology (although it probably had it previously) and the accompanying
polygon layer (fwsenetbu polygon).
The coverage fwsenetbu now
has the desired topology (although it probably had it previously) and the accompanying
polygon layer (fwsenetbu polygon).
_________________________
BUILD vs. CLEAN
To construct topology and create feature attribute tables you can use either BUILD or CLEAN. They differ somewhat. The major difference is that CLEAN uses a fuzzy tolerance to actually move or change features whereas build only develops the topology (relationships between features). Hence, BUILD cannot create intersections, whereas CLEAN creates intersections wherever lines cross one another (places nodes at intersections). In addition, CLEAN can correct undershoots and overshoots (dangles) as specified, so after major editing on lines or polygons use CLEAN, or when it is known that lines have been added without intersections being broken. Because CLEAN makes generalizations, it should be avoided whenever possible. See Table 1 below for a list of differences..
Table 1. Build versus Clean.
Capabilities/Processes BUILD CLEAN Polygons Yes Yes Lines Yes Yes Points Yes No Numbers features Yes Yes Calculates spatial measurements Yes Yes Creates intersections No Yes Processing speed Faster Slower
The purpose of this exercise is to check for coverage errors, which should be done after you've created the initial topology for your fwsenet (now fwsenetbu) coverage.
For example, if you have an arc splitting your polygon, you can activate the
polygon layer, select the common arc, be sure that the Shared Edit tool ![]() is active, and delete the arc. However, using this technique, you will also
have to eliminate the extra label. If you use topological tools to reshape the
polygon instead (in the polygon layer), the label will be removed automatically.
For example, use Merge to eliminate a common Arc between two polygons to create
one polygon.
is active, and delete the arc. However, using this technique, you will also
have to eliminate the extra label. If you use topological tools to reshape the
polygon instead (in the polygon layer), the label will be removed automatically.
For example, use Merge to eliminate a common Arc between two polygons to create
one polygon.
![]() Some of these functions only worked with Geodatabase layers at ArcInfo 8.0. However,
ArcInfo 8 does not perform topological overlays on anything but coverages yet, so
for a short period of time we will have to 'trick' the system into doing what
we want. We are now using ArcInfo 8.1 (ArcGIS), which is supposed to fix some
of these bugs. We will see...
Some of these functions only worked with Geodatabase layers at ArcInfo 8.0. However,
ArcInfo 8 does not perform topological overlays on anything but coverages yet, so
for a short period of time we will have to 'trick' the system into doing what
we want. We are now using ArcInfo 8.1 (ArcGIS), which is supposed to fix some
of these bugs. We will see...
Once the spatial errors have been identified, they can be corrected with ArcMap using the following general steps:
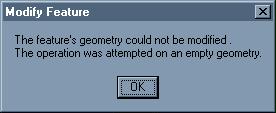
If at anytime throughout the following
exercises you see an error message that looks
like this,
the reason is because you have not asked the
computer to automatically update the feature
geometry by right mouse-clicking directly over the
modified feature and choosing Finish Sketch.
- In ArcCatalog, highlight fwsenetbu.
- Right mouse-click, select Copy.
- In ArcCatalog, right mouse-click, select Paste, type the new name, fwseneted.
- To add the fwseneted coverage-polygon layer to ArcMap, click on the Add Data
button.
- When the browse window pops up, double-click fwseneted coverage to see the layers, and then double-click the polygon layer.
- Click on Editor to activate the drop-down window, and choose Start Editing.
- Be sure the Target is fwseneted polygon.
- Click Editor and choose Snapping...
- Check the features you wish to snap.
- Look at the options for editing features, read about the function of each in Help, and then choose the appropriate method depending on what you need to edit. Be sure to select the shared edit tool
if the features you are editing are shared by other features, like boundaries of polygons (which are shared by two polygons).
- Click on Task/Create New Feature, Task/AutoComplete Polygon, Task/Select Features Using a Line,
etc...
- Select Help/ArcMap Help
3. Select and edit the feature.
- Using the mouse cursor and left mouse button, point to the features to select.
- Use the Shared Edit tool
. However, since you are editing arcs making up polygons, you must use the shared edit tool
- Delete the selected feature by hitting the Delete key on the keyboard.
- To bring it back use Ctr-Z.
- Add verticies to reshape feature. The following instructions come directly from ArcMap Help.
- Click the Current Task dropdown arrow and click Modify Feature.
- Click the Shared Edit tool
- Move the pointer to where you want the vertex added and right-click.
- Click Insert Vertex. A vertex is added to the sketch.
- When finished modifiying the line, right-click and choose Finish Sketch.
- This might be a good time to save your work.
- Now use ArcMap to fix label errors.
- Add the fwseneted label layer to ArcMap.
- Select any extra labels (like the ones you may have in the lower portion of the coverage) and delete them using the Delete key on the keyboard. Don't delete labels inside of polygons (you can't anyway, hopefully).
- 'Play around' with some of these editing features.
4. If appropriate, Save the changes made to the coverage by clicking on Editor/Save Edits. Exit ArcMap.
![]() If your coverage was correct,
you do not have to save it.
If your coverage was correct,
you do not have to save it.
5. When you make changes to your coverage you should check/rebuild the topology.
6. Exit ArcCatalog and logout.
![]() You may skip this Step and Step 1 below if you choose to complete Exercise
3D during this session.
You may skip this Step and Step 1 below if you choose to complete Exercise
3D during this session.
The purpose of this exercise is to gain additional experience with ArcMap.
You will need a coverage with polygon topology named fwseneted in your
workspace.

Select features using a line.
Select features using a polygon.
Extend/Trim Lines
Trim using a sketch
Move vertices: Moving a vertex in a sketch offers another
way to modify or reshape a feature. With the Editor you can move a
vertex in several ways: by dragging it, specifying new x,y
coordinates, or moving it relative to its current location.
Add a vertex |