EXERCISE 1
ORIENTATION
FOR/GGR 525
Today's lab consists of an orientation to the College's GIS
Facilities, an outline of the Login Procedure,
and a brief introduction to Windows
and ArcGIS through the use of exercises.
Whenever possible, lab exercises will use the following typographic conventions:
Computer commands or application are in bold.
Names of files, folders, data, or other kinds are in italic.
Items which you must choose or fill in (as in your user name) which vary
from person to person are in "quotes."
GIS FACILITIES
Current CESM Hardware and Software information:
Hardware
and Software
ACCOUNT INFORMATION
Each student must request an account. Refer to the CESM
account information web page. Please be sure to read about known
problems before seeking help about your account.
LOGIN PROCEDURE
Windows is a multi-user operating system. You will be logging in to your account
on an NTServer as your classmates and other users are also logged in, each using
their own account.
Windows Login Instructions
- Select Ctrl+Alt+Del
- In the Login window, enter your user name and password.
 You are now logging in to a
Windows machine. This can take 45 seconds or more, depending on current system
load. Initially you may see a window stating that it is generating browser
information. This will eventually disappear or you can select OK
within this window.
You are now logging in to a
Windows machine. This can take 45 seconds or more, depending on current system
load. Initially you may see a window stating that it is generating browser
information. This will eventually disappear or you can select OK
within this window.
- Complete the attached Exercise 1A, Introduction to Windows.
- Complete the attached Exercise 1B, Introduction to ArcInfo.
- Exit all application.
-
Logout of Windows using Ctr-Alt-Del (click the Log Off... button).
- !!!!!! PLEASE DO NOT TURN OFF THE PC !!!!!!
- Clean up your work area.
- Call your mother - tell her you love her.
EXERCISE 1A - Introduction to Windows
-
Customizing the Login Account
You may wish to customize your login account. I recommend that you place a
shortcut for Windows Explorer, ArcInfo Workstation, ArcToolbox, ArcMap, and
ArcCatalog somewhere on your desktop. We will be working with all these tools,
and it will be useful to be able to access them easily. To do this:
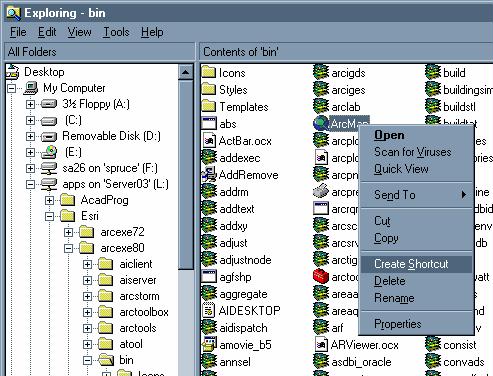
- Find the application to which you wish to create a shortcut.
- Do this using Start/Programs/Windows Explorer.
- For example, make a shortcut to Windows Explorer by browsing in C:\winnt
until you come across the executable (
 ).
).
- Right mouse-click the executable.
- Choose Create Shortcut.
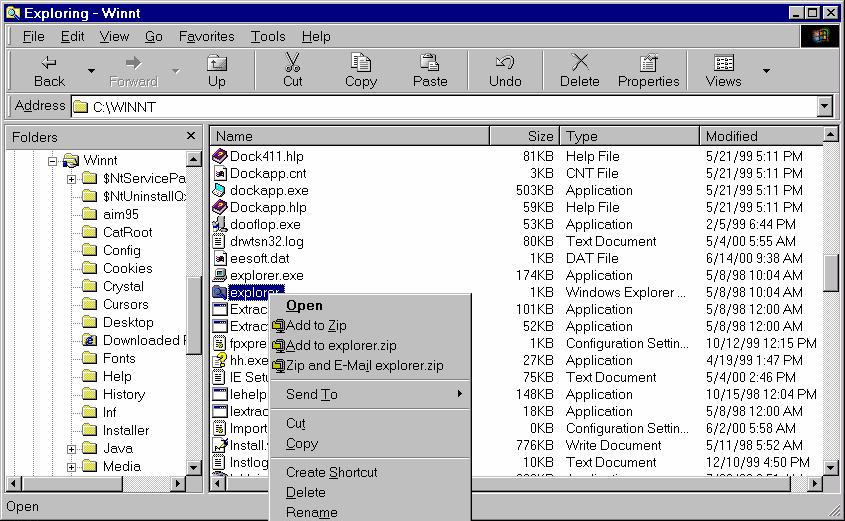
- Now you will find the shortcut on your desktop.
- You may need to use Start/Find/Files or Folders in order to locate
the executable. For example, type in arccatalog.exe to find
the executable for ArcCatalog. Be sure you are looking in My Computer
so that all drives will be included in the search.
-
Become Familiar with Local and Mapped Drives and Workspace
You will need to become familiar with some areas of the computing system upon
which you will be working.
- First, you have a personal diskspace area to which all files
will automatically be written. Figure out where this is and keep an eye
on it. More than likely it is called z:\"your username"$. This
is your space on the college's main server (hidden in some dark, locked
room) mapped to your current workstation via the network. Your Z drive should
be mapped automatically. If it is not, please go talk to the Windows administrator
in Rm. 109 or 111.
- The 'model' dataset to be used later in the course is also on the server.
This dataset is located at Q:\acaddata\flag24.
- In the flag24 dataset, there are 3 folders, cover, shape,
and grid. The vector coverages you want to use are under cover
and there are raster datasets under grid.
EXERCISE 1B - Introduction to ArcInfo and ArcGIS
Background
Environmental Systems Research Institute, Inc. (ESRI) began development
of ArcInfo GIS in the late 1960s. ArcInfo (later versions are referred to as ArcGIS)
has several components. Everything that ArcInfo can do is accessible at the
command line which can be initiated using Start/Programs/ArcInfo/ArcInfo
Workstation/Arc.:
If you wanted to work at the command line in ArcInfo, use a command window
and type Arc. To quit out of the ArcInfo, type Quit.
Traditionally, i.e. for the last 30 years, this command line prompt
has provided access to the essence of ArcInfo.
You may have heard of ArcView. This is an application developed by ESRI
which began as an easy-to-use viewer of ArcInfo data, but its popularity
demanded increased functionality of the GUI (Graphical User Interface)
over time. As ESRI began developing GUIs for ArcInfo, it became clear
that the technologies would have to merge to economically continue development.
With the release of ArcInfo 8.0, many (but NOT ALL) of the commands (tools)
have been turned into GUIs which look just like the typical Windows applications
you have probably become familiar with working with Windows 3.1, 95, 98,
2000, or NT. Currently these tools are divided into 3 different applications
(Table 1).
Table 1. ArcInfo GUI applications at Version 8.
| ArcCatalog |
Viewing data sources in a Windows Explorer-like format,
some editing of data/table structures. |
| ArcMap |
Editing and viewing internal features of datasets, map
making. |
| ArcToolbox |
Tools typically performed on an entire dataset at once. |
Keep in mind that the major portion of ESRI's development on ArcInfo
currently is in the form of GUI production, and that there are many functions
that are possible at the ArcInfo prompt but are not yet GUI-fied.
At the release of ArcInfo 8.1, ArcView no longer exists as an independent
software, i.e. ArcView has become just a subset of ArcInfo. Therefore,
in the class as you come to know ArcInfo, you will be learning ArcView
by default.
To Complete the Exercise
- Start each of the applications and become familiar with their look. Also,
I recommend you make shortcuts to each of these programs.
Start/Programs/ArcInfo/ArcCatalog
Start/Programs/ArcInfo/ArcMap
Start/Programs/ArcInfo/ArcToolbox
- In ArcCatalog, find the model data with which we will be later working.
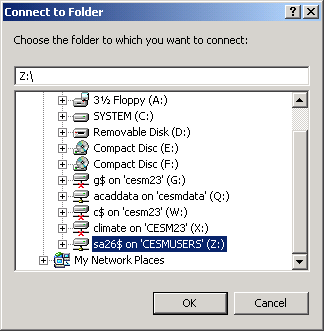
- Choose File/Connect Folder... or the Connect to Folder button
 .
.
- Highlight the flag24 on cesmdata ("your drive":/Q)
folder (refer to Ex. 1A:2:b).
- Click OK.
- Now create a workspace for today's experimenting and for future lab exercises:
- Start ArcCatalog.
- Use the Connect to Folder button
and click your personal folder on the Z drive.
- It should be named "your user name"$ on 'CESMUSERS' (Z:).
- Choose OK.
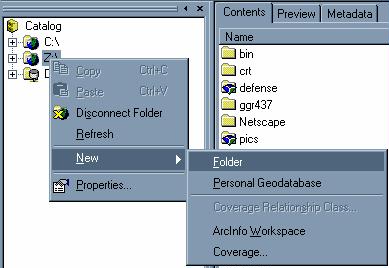
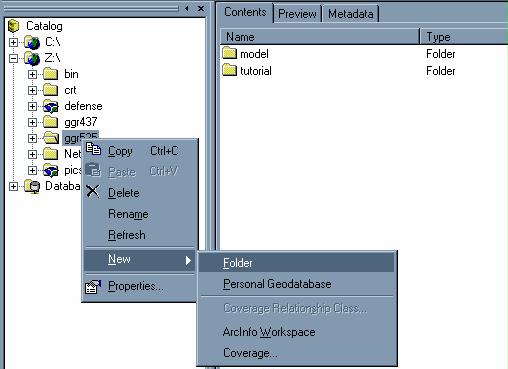
- Now highlight (click) your folder in ArcCatalog and choose File/New/Folder
from the Explorer menu.
- Name the new folder ggr525.
- Click the + sign on the Z:\ to open it.
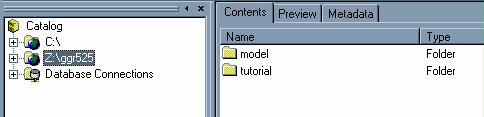
- Highlight the newly created folder and make a new ArcInfo workspace for
learning called tutorial, and one for the model called model.
- Now, make a direct connection to the ggr525 folder using the Connect
to Folder button
again.
- Remove the old connection using the Disconnect from Folder
 button. Now you can easily get to your working area.
- Create an empty ArcInfo coverage:
- In ArcCatalog menu, choose File/New/Coverage...
- Call the new coverage tempcov.
- Click the Define button.
- Choose Define a coordinate system for my data to match existing data.
- For Dataset, browse to the amerind coverage in the flag24
dataset (under the Coverage folder).
- Click Finish.
- In the New Coverage window, continue to the next step.
- For Base feature class:, choose Polygon.
- For Precision:, choose Single.
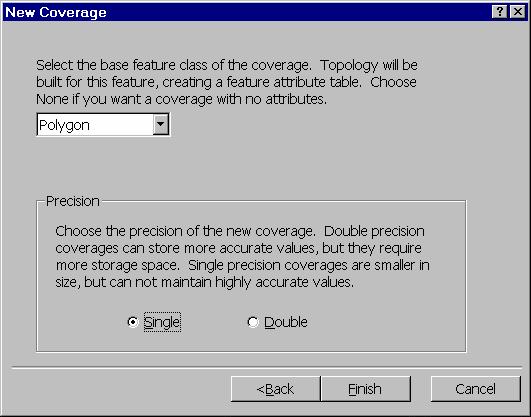
- Click Finish.
A coverage is the framework
for vector (as opposed to raster/image format) data storage in ArcInfo.
ArcInfo 8 can also work with ArcView's shapefiles, and is developing a new
data model paradigm called a "geodatabase." For now, we will work
just with coverages, which are also referred to as covers.
- See the coverages in the workspace.
In ArcCatalog, polygon coverages are shown with this icon:
 , line (arc) coverages are shown as
  , and point coverages are shown as
  .
It is easy to see whether or not your attempt at creating a new coverage was
successful by selecting the tutorial folder:
.
It is easy to see whether or not your attempt at creating a new coverage was
successful by selecting the tutorial folder:

Capture the ArcCatalog image of the coverages you have created, print it,
and hand it in to your lab instructor.
- Inspect the structure of this workspace with Windows Explorer (but never
rename, create, delete, or move GIS files with this tool!). As mentioned above,
a workspace is actually a folder, or directory. It is composed of files and
folders.
Within a workspace, a coverage is stored as a folder, and files within that
folder.
Some components of a coverage are also stored as INFO database files which
are located in a folder called "info" ( )
located within the workspace. INFO is a relational database developed in the
60s by PRIMOS.
)
located within the workspace. INFO is a relational database developed in the
60s by PRIMOS.
The view of the same data from Windows Explorer looks quite different from
the view seen in ArcCatalog. ArcCatalog knows how to manage GIS data. This
is why we will always use ArcCatalog to manage our data. Also, we can drag
and drop coverages and other files for input into tools in ArcGIS, instead
of having to browse for them.
Geodatabases, which do not yet support polygon overlay at Arc 8 (or we would
be using them), utilize the MSAccess relational database instead of INFO,
and so they are easier to manage having no external, but related, INFO folder.
- Remove the temporary coverage you created previously by right mouse-clicking
tempcov in ArcCatalog and choosing Delete.
You SHOULD
NEVER
"drag and drop" coverages from Windows Explorer. You must use the
ArcCatalog interface to manage ArcInfo coverages.
- Open ArcCatalog Help by selecting Help/ArcGIS Desktop Help from the ArcCatalog
menu.
- Using the Search tab, find, and display the entry on "What's in the Catalog?" Read through
each topic.
- Return to ArcCatalog and exit by choose File/Exit from the menu,
or select the
 in the
right hand corner of the window.
in the
right hand corner of the window.
- In this course many readings will be assigned from the online help in various
applications. It will be advantageous to you to become familiar and comfortable
with reading help from the screen. However, documents can be printed if you
have trouble reading them on the computer display.
 Return to Class Home Page...